How I got the internship
I had participated in a Machine Learning Hackathon, organized by Flipr Innovation Labs. They gave us a task that was to be completed in 36 hours. Attached with the task letter was an extremely dirty dataset. You can read my entire hackathon experience here. TLDR: I secured a place on the merit list (2nd position, to be precise). And that’s how I knew I was shortlisted for an internship with them. I then had a chat with their CTO, on my ML-DL experience and on the projects that I’d built in the same domain. After a short interview, I got an email that I’d landed an internship at Flipr!
The project that I worked on
Flipr Innovation Labs is a solution based company. The project that I was assigned was for a FinTech client. I worked on Aadhar UID extraction, validation & masking. We often submit scanned aadhar card documents to banks, government offices etc. Have we ever wondered how they handle/store our documents? This project was about extracting relevant information (12 digit UID - Unique Identification Number) from aadhar cards. (UID & Aadhar Number are used interchangeably in this article)
In 2019, the Reserve Bank of India updated the master direction on KYC guidelines for regulated entities. The updates in the KYC process were mainly targeted at adhering to the Aadhaar and Other Laws Ordinance. Thus, any entity cannot store Aadhar card of their customers/users without Masking the UID. The goal was this - take whatever aadhar card documents that are there, extract & validate the UID from those docs, and mask it before storing.
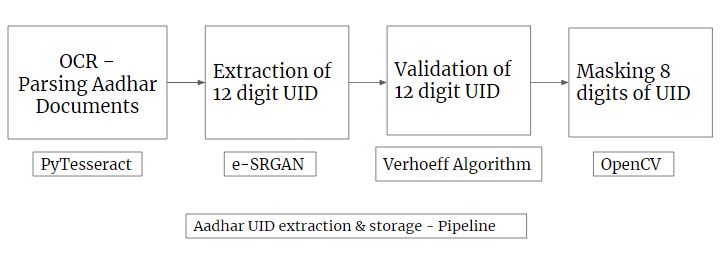
So, our project was broken down in the following 4 tasks:
- Parsing of Aadhar documents using Tesseract [OCR]
- Extracting the 12 digit UID using regex [+SRGAN]
- Validation of extracted aadhar number (To ensure the UID extracted is accurate) using Verhoeff Algorithm
- Secure Masking of UID

Attempts at Cleaning the data
We had a large database of scanned Aadhar cards. Looking at the scanned copies I knew it was going to be no easy task to extract UIDs from them. Why? Because the Aadhar Cards were badly scanned, blurry, rotated, tilted and stored in different file formats. SO basically the dataset that we had was dirty. And our task was to clean it.Initial Approach: As soon as I ran some basic OpenCV filters on the aadhar images, I knew most of them had salt & pepper noise. Thus, I knew Median Filter would do the best job at removing noise. But soon I knew OpenCV approaches would not help, we needed an all wrapper. That’s where GANs come into the picture.
Final Approach: Enhanced SRGAN. After a lot of trial and error, we decided that we have to use SRGANs to enhance the quality of our Aadhar docs. SRGANs are used for single image super resolution. How? Here - So Super-resolution GANs apply a deep network in combination with an adversary network to produce higher resolution images. Thus wherever quality of image matters, SRGANs are best to be used.
1. OCR (Optical Character Recognition)
Recognising characters from images, and puts them down in form of text. We used Pytesseract, which is an OCR tool for python that also serves as a wrapper for the Tesseract-OCR Engine. It can read and recognize text in images and is commonly used in python OCR image to text use cases.2. Extraction of UID
This involved using image preprocessing techniques to extract the exact UID from the OCR text. If the correct UID is still not being recognized due to bad image scan quality, we use the ESRGAN (Enhanced Super Resolution Generative Adversarial Network) technique to enhance the quality of image.3. Validation/Verification of UID
The GoI has created the 12 digit aadhar UIDs such that the last digit is a checksum which can be calculated using Verhoeff algorithm. Verhoeff Algorithm uses permutation and multiplication tables for validation & verification of checksum We verify whether the UID extracted in valid, if not then we delete the invalid non-matching UIDs that are generated in the process.4. Masking
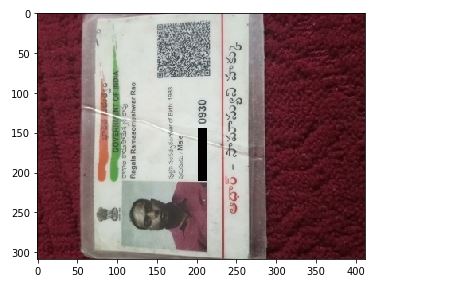
Secure Masking of UIDs. We use OpenCV to mask/black out the aadhar number using the same bounding boxes as used for extraction.Here is a toned down version of what I worked on, in my internship. The complete pipeline has been reduced to a single input for ease & presentation purpose in the .ipynb notebook. The below image shows the final output document after successful extraction , validation & masking.

What I learnt
- I learnt how to work in autonomous teams.
- Self research + Implementation. So I would read research papers on how best resolution images are produced using image processing techniques, and then try to implement them.
- My Guide/Manager Anuj taught me how to deal with everything very calmly. He helped me implement these complex concepts with a calm mind.
I learnt a lot in the 3 months that I interned at Flipr, and everyone in team was super helpful!